Ethical Hacking

Itt található minden munkámmal kapcsolatos dolog

The big GSM write-up – how to capture, analyze and crack GSM? – 4.

So. I had some requests asking me about how I did what I did with GSM. What tools did I use, what hardware and what options?
Since I believe strongly that GSM needs to be “out in the hands of the people” meaning everybody should have access to cheap hardware and free, opensource software that helps understanding GSM in practice I thought I will create a series of write-ups describing the whole process from the beginning.
Enjoy! :-)

DISCLAIMER: EVERYTHING DESCRIBED HERE IS ONLY FOR EDUCATION PURPOSES. ONLY DECODE YOUR OWN DATA, NEVER TRY TO DECODE ANY DATA THAT IS NOT YOURS/YOU DON’T HAVE PERMISSION TO DECODE, RESPECT THE PRIVACY OF OTHERS!
I don’t take responsibility for how you use the konwledge you gained here.

Fourth step: Capture data with RTL-SDR, decode it with airprobe

As it could be read on RTL-SDR.com (I modified the original text with some enhancements):

Receive a Live Channel

First of all we need to find the frequency of the channel we are going to decode. There are a lot of both online and offline tools to convert an ARFCN number to actual frequency. Here I am going to use an offline tool called arfcncalc:

./arfcncalc -d -a ARFCN

Naturally instead of ARFCN you need to specify the ARFCN number, the -d switch tells the program to give us the downlink frequency (-u would give us the uplink).

To decode a live channel using RTL-SDR type in terminal

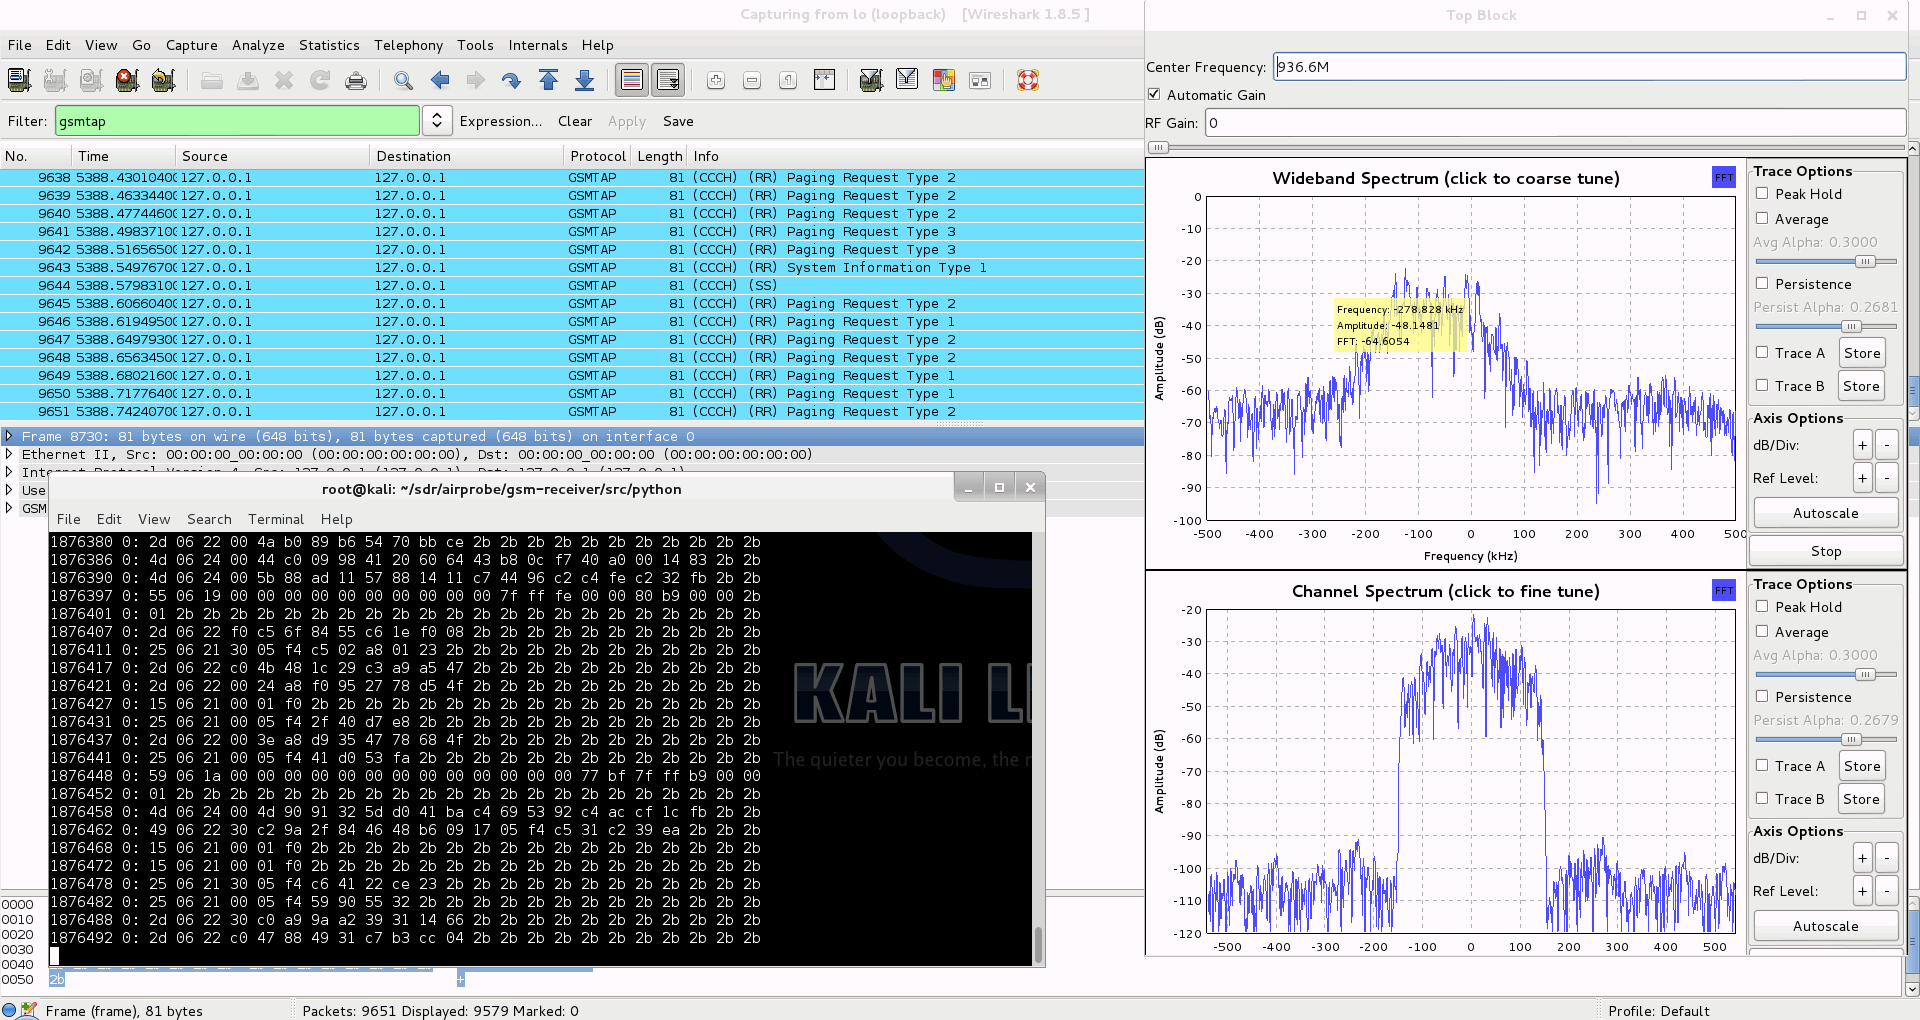
./gsm_receive_rtl.py -s 1e6 -f FREQUENCY

A new window will pop up, click in the middle of the GSM channel in the Wideband Spectrum window. Within a few seconds some GSM data should begin to show constantly in wireshark. Type ./gsm_receive_rtl.py -h for information on more options. The -s flag is used here to set the sample rate to 1.0 MSPS, which seems to work much better than the default of 1.8 MSPS as it seems that there should be only one GSM peak in the wideband spectrum window.

GSM Decoding with Airprobe and Wireshark and RTL-SDR Software Defined Radio

If you have trouble getting data, but receive many errors like

sch.c:260 ERR: conv_decode 12

then you should calibrate your RTL-SDR stick using the kalibrate-rtl program, described here.

After you determined the offset of your RTL-SDR calculate average of the different offset values. You will get something like this for example: +24.7 kHz. This actually is 24700 Hz, the plus means that the RTL-SDR tunes itself generally around 24700 Hz ABOVE the frequency you set it on, so you need to SUBTRACT this frequency from the result you got with ARFCNcalc. If your average offset is negative then naturally you need to ADD the average offset to the result of ARFCNcalc instead of subtracting it.

Use the new frequency to fire up RTL-SDR again, and let it warm up for some minutes. You should see some improvement compared to the first, uncalibrated test.

Capturing a cfile with the RTL-SDR (Added: 13/06/13)

I wasn’t able to find a way to use airprobe to capture my own cfile. I did find a way to capture one using ./rtl_sdr and GNU Radio however.

First save a rtl_sdr .bin data file using where -s is the sample rate, -f is the GSM signal frequency and -g is the gain setting. (rtl_sdr is stored in ‘gnuradio-src/rtl-sdr/src’)

./rtl_sdr /tmp/rtl_sdr_capture.bin -s 1.0e6 -f 936.6e6 -g 44.5

Next, download this GNU Radio Companion (GRC) flow graph (scroll all the way down for the link), which will convert the rtl_sdr .bin file into a .cfile. Set the file source to the capture.bin file, and set the file output for a file called capture.cfile which should be located in the ‘airprobe/gsm-receiver/src/python’ folder. Also, make sure that ‘Repeat’ in the File Source block is set to ‘No’.

Now execute the GRC flow graph by clicking on the icon that looks like grey cogs. This will create the capture.cfile. The flow chart will not stop by itself when it’s done, so once the file has been written press the red X icon in GRC to stop the flow chart running.

After we have the cfile we can actually decode it just like as it was captured using a USRP, so you need to fire-up Wireshark listening on lo (localhost) and say:

./go.sh capture.cfile 64 0B

It will probably work for you just fine, data will flow into Wireshark as expected. The 64 is the decimation rate of the RTL-SDR, 0b is the configuration go.sh is going to use: 0 means Timeslot 0 (beacon channel), b is the configuration the cell uses on the beacon channel (see the ‘Signaling Channel Mapping’ in this chapter of ‘Introduction to GSM’ to see what this means).

Here are all the available configurations that are supported by airprobe:

     0C : TimeSlot0  "Combined configuration", with SDCCH/4
          (FCCH + SCH + BCCH + CCCH + SDCCH/4)
     0B : TS0  "FCCH + SCH + BCCH + CCCH"
     1S : TS1  SDCCH/8
     2T : TS2  (Full Rate) Traffic
     1TE: TS1  Enhanced Full Rate Traffic

If you look at the traffic in Wireshark but it doesn’t seem to be right (for example you made a call or sent a text message while capturing but the Ciphering Mode Command is missing) it is pretty sure that you are using the wrong configuration (0b instead of 0c or vise versa). It is important to try both and figure out which one is correct for the cell you are observing.

I will assume you sent a text message to yourself while capturing data.

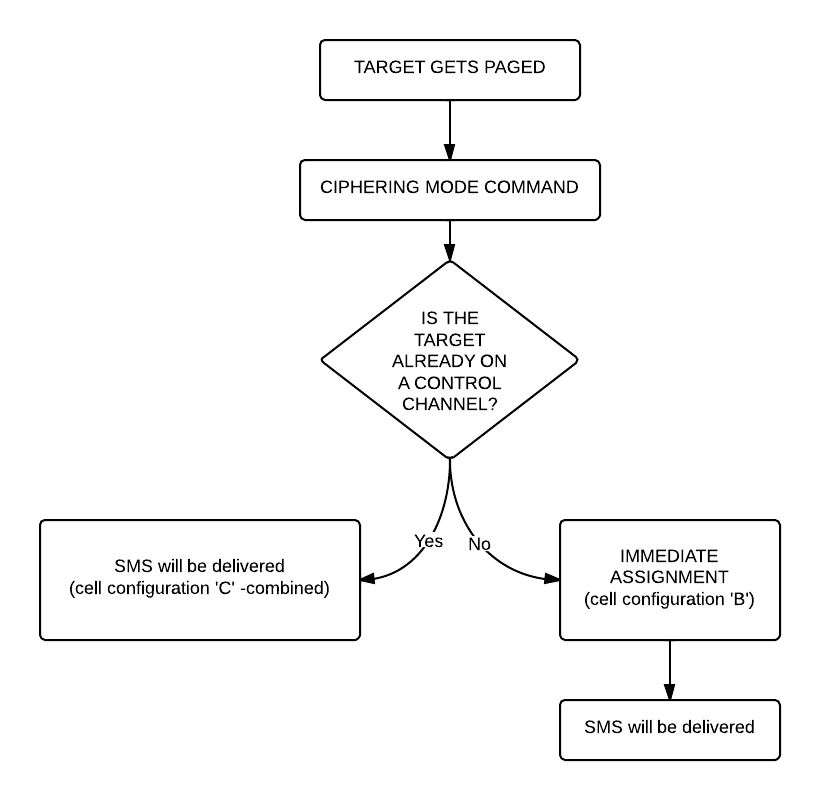
So now you can see all the messages of the beacon channel, but what are you looking for in the Wireshark log? It is quite simple: first a “Paging Request” for the TMSI of the target phone, then a “Ciphering Mode Command”. These are the messages which indicate that a transaction actually happened.

Now to continue with the flow it is best to try to decode the same cfile but now giving the key too to go.sh:

./go.sh capture.cfile 64 0C KEY

How to get the key? I already posted about that. Since we are testing using our own equipment we have access to the SIM card, so we can extract the key. It is best to extract the key immediately after you did a capture with RTL-SDR because depending on the network configuration the key could change.

What are we looking for now? Well, it depends on the network: either there is an “Immediate Assignment” telling the phone to move to different timeslot (so they are not using the busy beacon channel to do their business) or you will actually be able to see the text message (easy to recognize: its protocol in Wireshark is ‘GSM SMS’), it will look like this:

If instead of the SMS you find an “Immediate Assignment” message you need to open it and see which timeslot the phone is being commanded to and then you need to decode that timeslot using go.sh. So, for example if it says that the phone needs to go to Timeslot 2 then your command would be:

./go.sh capture.cfile 64 2S KEY

Notice that I did not only change the Timeslot number from 0 to 2, but also the configuration from C to S, because the target phone is now on a Standalone Dedicated Control Channel (SDCCH), not on the beacon channel so we need to decode it differently.

Also worth noting that SMS messages are almost always sent on the Control Channel not on the Traffic Channel.

Here is a flowchart of the whole process to make it easier to understand (naturally since we can only see the downlink this shows only what happens on the downlink):

gsm_sms_flowchartNow that we were able to decode an SMS let’s get to something a little bit harder: decoding a voice call!

Well the first step is the same as it was when we decoded a text message: we look at the beacon channel, Timeslot 0:

./go.sh capture.cfile 64 0C

What do we expect to see? Nothing besides the “Cipher Mode Command” because we didn’t provide the key, so let’s do that:

./go.sh capture.cfile 64 0C KEY

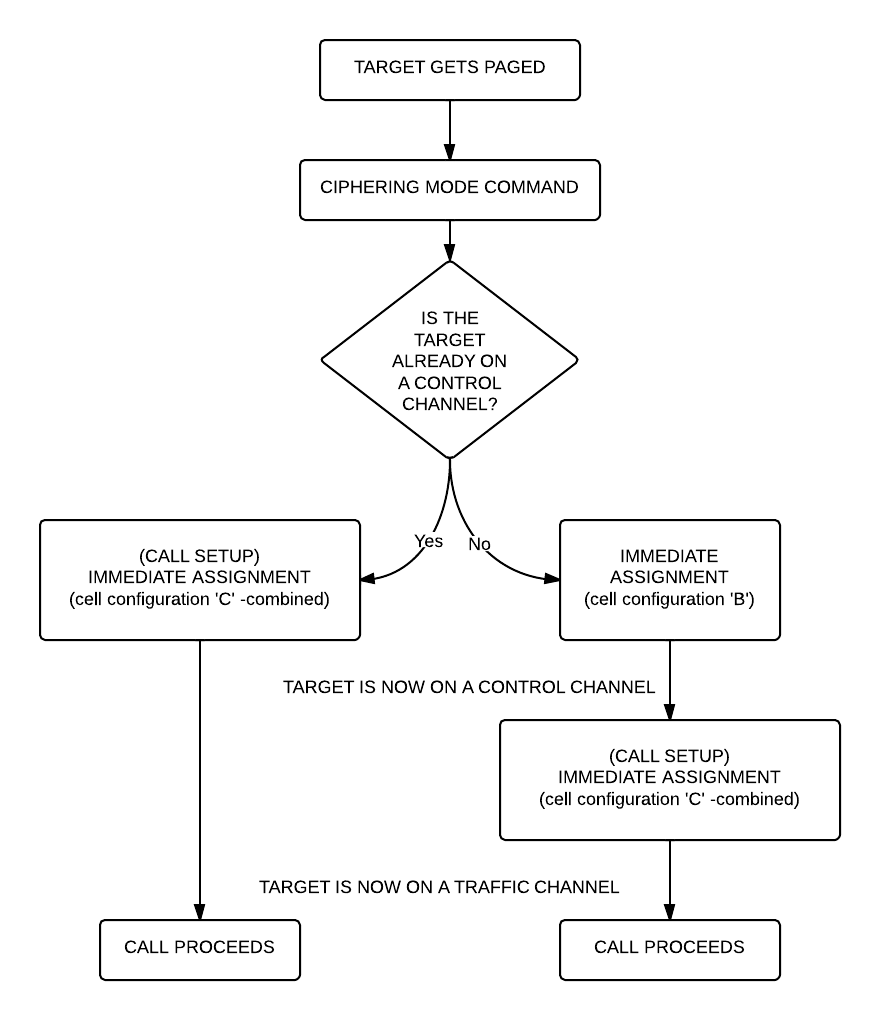
All right, what should we see now? Logically there needs to be an “Immediate Assignment” command, because the phone NEEDS to change at least once to a different timeslot to receive voice data (to a Traffic Channel, Timeslot 1-7).  What we saw when decoding the SMS is correct here too: depending on the network configuration we can see some messages about the call setup (if it is an incoming call we can even see the caller ID – the phone number calling our target) then an “Immediate Assignment” (configuration ‘C’ – combined) or we can only see an “Immediate Assignment” directing the phone to a Control Channel (just like it happened when receiving an SMS, configuration ‘B’).
Of course if you follow the phone to the Control Channel you will see the call setup messages (in case of an incoming call) then another “Immediate Assignment” command, this time directing the phone to a Traffic Channel.

Here is again a flow chart showing the process:

gsm_call_flowchart

Now there is only one question left: how do we decode the traffic channel to actually get the voice data?
Again, it is something that depends on the network: if the network uses simply Full Rate Speech then you can do the same what has been written in Srlabs’s tutorial:

./go.sh capture.cfile 64 1T KEY

What does this command do? It decodes Timeslot 1 as a Traffic Channel. We know what timeslot to decode from the “Immediate Assignment” command message, T means Full Rate Speech. The command results in a file called “speech.au.gsm”, which needs to be converted to .au file using ‘toast’:

toast -d speech.au.gsm

The resulting .au file could be played back using any player, e.g. cvlc (Command Line VLC):

cvlc speech.au

If you can not hear anything but beeps and other weird noises then there is a pretty good chance that the cell is using Enhanced Full Rate Speech instead of simple Full Rate Speech. To decode the channel as an Enhanced Full Rate Speech Traffic Channel:

./go.sh capture.cfile 64 1TE KEY

This results in a file called “speech.amr” which could be played back without any more modifications using for example Commandline VLC:

clvc speech.amr

If you have one hour to see everything in more detail, explained by a professional I would encourage you to watch this video:

UPDATE: I also uploaded my slides from Hacktivity.

The big GSM write-up – how to capture, analyze and crack GSM? – 3.

So. I had some requests asking me about how I did what I did with GSM. What tools did I use, what hardware and what options?
Since I believe strongly that GSM needs to be “out in the hands of the people” meaning everybody should have access to cheap hardware and free, opensource software that helps understanding GSM in practice I thought I will create a series of write-ups describing the whole process from the beginning.
Enjoy! :-)

Third step: uncover the TMSI

The script I used at Hacktivity needs to be finalized, also the Android app (SilentSMS) needs some re-factoring, so this step is going to be released later.

UPDATE (19/10/2013): I started fixing the code, first up is the Android app which seems to be ready from my point of view, but since I haven’t checked it with anyone else I am going to say it is alpha quality code, a little bit better than a PoC.
https://github.com/domi007/silentSMS

UPDATE (05/09/2014): Since I didn’t have time in the past to release tmsi_buster.py I will at least add some guidance here if someone wants to create it:

  1. Install my SilentSMS application onto an Android phone, then decide which way to connect to the phone (USB tethering/WiFi/WiFi tethering all are options)
  2. Start the app, it will start listening on the port 1337
  3. You can telnet to this port, and enter a phone number and hit enter – the app will send a silentSMS to that phone number

So, you now have a way of sending silent text messages, so you now you just need to monitor all the paging requests. You can use RTL-SDR for that or osmocomBB. The thing left is to collect all the TMSIs, and try to figure out from them which is the one you are looking for.

First observe the paging requests (especially the TMSIs in them) on the console – how many times is the same TMSI paged? Some networks page 2, even 3 times and then continue with the transaction, so if you sent 3 SMSes you will see a TMSI being paged 6 times, not 3 times as one would expect. So you need to create a script that counts how many times is a TMSI paged based on the output of RTL-SDR (+ tshark + a good wireshark filter) or osmocomBB and while doing that it sends out silent SMS messages via the telnet interface. After 2-3 messages you can see how many TMSIs you have with 2 (or 4)-3 (or 6) pagings. If you get multiple results you can eliminate the wrong ones easily by sending more SMSes, but monitoring only the TMSIs you got from the previous run.

The big GSM write-up – how to capture, analyze and crack GSM? – 2.

So. I had some requests asking me about how I did what I did with GSM. What tools did I use, what hardware and what options?
Since I believe strongly that GSM needs to be “out in the hands of the people” meaning everybody should have access to cheap hardware and free, opensource software that helps understanding GSM in practice I thought I will create a series of write-ups describing the whole process from the beginning.
Enjoy! :-)

Second step: get your environment up and running

Prerequisites:

native (!) Linux system for OsmocomBB, virtualized/native Linux for RTL-SDR

An easy way to install a native Linux system is using Wubi.

1. RTL-SDR :

http://www.rtl-sdr.com/rtl-sdr-tutorial-analyzing-gsm-with-airprobe-and-wireshark/
This article is the best, it simply covers the whole process from A to Z.

To get the best reception you should always calibrate your RTL-SDR dongle:
http://www.rtl-sdr.com/how-to-calibrate-rtl-sdr-using-kalibrate-rtl-on-linux/

It is important to know that decoding GSM requires quite an amount of processing power (even more if you do it in real-time using gsm_receive) so if you use it in a virtual machine don’t forget to give it at least 2 processor cores. On my machine (Core i5 first generation) using just one core gsm_receive wasn’t usable at all.

2. OsmocomBB:

I assume you completed the first step, so you already have libosmocore installed (!).
First of all you will need to set up an ARM cross compiler, like this:

  wget http://gnuarm.com/bu-2.15_gcc-3.4.3-c-c++-java_nl-1.12.0_gi-6.1.tar.bz2
  tar xf bu-2.15_gcc-3.4.3-c-c++-java_nl-1.12.0_gi-6.1.tar.bz2

UPDATE: instead of the above use this tutorial to get a toolchain:
http://bb.osmocom.org/trac/wiki/toolchain

Then clone the OsmocomBB git repository and compile it:

  git clone git://git.osmocom.org/osmocom-bb.git
  cd osmocom-bb/src
  export PATH=$PATH:/path/to/the/toolchain/gnuarm-3.4.3/bin
  make

Now it is a good time to do some testing whether OsmocomBB compiled fine or not. Connect your OsmocomBB phone to your PC and run the following command (assuming you are in the src directory):

./host/osmocon/osmocon -p /dev/ttyUSB0 -m c123xor -c ./target/firmware/board/compal_e88/rssi.highram.bin ./target/firmware/board/compal_e88/chainload.compalram.bin

If everything is fine your phone should have the RSSI firmware loaded. If you get errors while loading the firmware you need to make sure your cable is fine and you are not using a virtual machine (the virtualized USB controller tends to mess up timings causing the chainloader code to fail).

Now that you can compile and run OsmocomBB code you will be able to run the my modified version of it (will be posted soon).

The big GSM write-up – how to capture, analyze and crack GSM? – 1.

So. I had some requests asking me about how I did what I did with GSM. What tools did I use, what hardware and what options?
Since I believe strongly that GSM needs to be “out in the hands of the people” meaning everybody should have access to cheap hardware and free, opensource software that helps understanding GSM in practice I thought I will create a series of write-ups describing the whole process from the beginning.
Enjoy! 🙂

First Step: understanding the basics of GSM, what’s the theory behind GSM-cracking?

GSM (Global System for Mobile communication) was introduced as a standard in 1991. The cipher used in GSM hasn’t been really well known but already in 1994 Ross Anderson published a theory about how to crack the encryption.

Later many people contributed to this theory essentially making GSM theoretically broken since 2003, but practical tools existed only for governmental organizations and mobile operators for such high prices nobody from the hacker community could buy them (not mentioning none of the manufacturers would have given him/her anything).
And this was the time when Karsten Nohl decided to dedicate some years as a researcher and as a manager to create both software and hardware that could turn theory into reality.

Every single year since 2009 Karsten and one member of his team released something, a milestone if you wish, which contributed to the death of myth that GSM is secure.

But there was one problem: all the details could never be released because of the rules of ‘responsible disclosure’ meaning that you can not give access to anybody to tools that exploit unpatched vulnerabilities in a live system. And boy, GSM does have quite some of these. However during the years we always got something, a piece of the puzzle so to speak:

  • 2009 – GSM rainbowtables with the tool Kraken (created by Frank A Stevenson) – they are useless without proper hardware that can capture GSM data but once we have the hardware cracking is possible
  • 2010 – airprobe which makes it possible to capture non-hopping GSM downlink channels with the USRP (combined with Kraken we have a full downlink sniffer on a single cell)

I am not listing 2011 here because there was no code released in that year (since the presented solution was a full blown GSM eavesdropping attack there was nothing to be released).

So, the landscape of GSM hacking consists of two hardware options: USRP or OsmocomBB. The USRP costs a lot, OsmocomBB has pretty much no code available.

My ideal setup would be a combination of these two: cheap hardware and software already available. Is there such a solution? Yes, there is.
You can use an RTL-SDR stick to capture GSM data from the air, just like you would do with a USRP. It is not as accurate, it does lose sync sometimes, but it works. And not only for single transmissions (SMS) but also for calls. I tested both, and I can confirm that it works.

So, now we have an established platform: we are going to sniff single frequency (non-hopping) GSM downlink-traffic. These are our limitations, airprobe is only capable of decoding the downlink and RTL-SDR isn’t capable of hopping along (although in theory you can use more sticks and lock each of them to a frequency and then re-construct the transmission by combining data from all dongles).

BEFORE YOU CONTINUE: if you haver never done anything with GSM, don’t know what a ‘burst’ is, or never heard of a ‘timeslot’ please stop reading this post and read at least the first 4 chapters of this introduction:
http://web.ee.sun.ac.za/~gshmaritz/gsmfordummies/intro.shtml

UPDATE: The page I referenced here went offline, so here is a PDF containing all its content.


Steps to crack GSM (originally outlined by Karsten Nohl):

  1. Get the TMSI of the victim
  2. Analyze the cell you and the victim are camping on
  3. Capture traffic and use the results of your analysis to construct input data for Kraken
  4. Use Kraken to crack the key
  5. Use the key to decode the data you captured

Get the TMSI of the victim

TMSI stands for Temporary Mobile Subscriber Identifier which is used on GSM networks to avoid the transmission of any information that would possibly identify a certain person (customer). We need to know this ID so we can tell when the victim is being paged (meaning that he/she is going to receive something from the network – call or SMS).
The idea behind uncovering a TMSI is quite simple: if the victim receives anything from the network he/she will get paged. So if we keep sending something to the victim (call/SMS) we can correlate the pagings we observe on the air with the frequency of the transactions we initiate. (this technique was first presented at 27c3 by Sylvain Munaut)
The ideal “thing” to send is a silent SMS: it will not show up at all on the victim’s phone (no sound, no notification, nothing) but we will get an acknowledge from the victim saying that our SMS was delivered.

Example scenario: we observe pagings and figure out that they page twice for each transaction, so if we send 3 silent messages there should be a TMSI which has been paged 6 times. By altering the number of messages sent we can quickly distinguish false positives from the real answers.

Test results: I actually did this attack at Hacktivity with a room full of people (meaning that the cell serving us was quite busy) and on my first attempt using 3 messages I only got two results back (meaning one of them was a false positive). Repeating the process would probably eliminate the false positive easily (there is very little chance that the same false positive would show up).


Analyze the cell

Since GSM cracking is based on knowing the content of encrypted bursts we need to figure out some information about the cell’s configuration. But wait you might say, what’s the point of this, ‘knowing the content of encrypted bursts’ renders encryption useless, doesn’t it?
Yes and no. Of course if you know the content of something that is encrypted there is no point in encryption. But in case of GSM it isn’t so simple: there are some bursts that are transmitted periodically, usually containing information about the system (System Information bursts). The only rule about these bursts is that they need to be transmitted no matter what. Even if the connection is currently encrypted these bursts will be transmitted (naturally in encrypted form).
So if we keep looking at the cell’s broadcast channel we can easily find a pattern which could be for example something like this

Paging Request for TMSI 11223344
Paging Request for TMSI 55667788
System Information Type 6
Empty Burst

Paging Request for TMSI 99887766
Paging Request for TMSI 00112233
System Information Type 5
Empty Burst

Paging Request containing TMSI 77001122
Paging Request containing TMSI 66005577
System Information Type 1
Empty Burst
and so on. As you can see the pattern repeats itself, just the type of the System Information changes, but for example there is always an empty burst at the end. This is just a fictional pattern but I hope you see the idea: some of these bursts are transmitted even if the connection is encrypted.
So if we look at the cell’s traffic, save the cleartext of a System Information Type 5 message, then capture some encrypted data containing the same message we can do:

cleartext System Information Type 5 XOR encrypted System Information Type 5

The result is the so called keystream (that comes out of the encryption function A5/1). Guess what do we need to feed our cracker, Kraken with? Yep, A5/1 keystream.

The challenge of course is to determine which burst of all the encrypted ones is the one containing in this case the System Information Type 5 message (again, we could have chosen any other message which has a known content). That’s why we need to analyze the cell’s configuration and make maybe one-two test calls to see the call setup.
Usually the call setup always happens the same way, so once you figured out what messages are sent during a call-setup you can safely assume that the same messages will be transmitted whenever there is a call-setup.

Using Kraken

That’s pretty straight forward: download the 1.6 TB of rainbow-tables, write them out to a hard drive and then fire up Kraken.
After it is ready just give it the crack command followed by the burst you would like to crack, like this:

Kraken> crack 001101110011000000001000001100011000100110110110011011010011110001101010100100101111111010111100000110101001101011

Decrypting traffic

Since GSM could be running in many different configurations you might need to try out more config. options of the tool go.sh to get it working properly. Otherwise there isn’t anything fancy about this step, all you need to do is pretty much giving it the key, the filename and ‘let it do the magic’.

This is the end of the first part of the series. I covered just the history of GSM hacking, what hardware do we have to do GSM hacking and basic theory behind the attack. In the next part we are going to set up our environment, then start real hacking with it. Stay tuned!

Aaaand it’s gone!

I just got an email from Opscode (the company behind Chef) that their wiki and ticketing system has been compromised, the attacker was able to download the whole database including usernames and passwords.

The passwords were hashed using PBKDF2 (Password-based Key Derivation Function 2) which is also used in WPA2, and quite effective in slowing down brute-force attacks.

There are two interesting facts:

1. This is the third email I got during this summer that describes a security breach which directly affects me

2. Opscode as far as I remember uses Atlassian’s JIRA for ticketing (and maybe for wiki too). Now if indeed Atlassian is the “third party” in the story “whose software has a vulnerability in it, which allowed attackers to gain access” then this is quite big news!
So JIRA users, watch out, there could be a vulnerability in your beloved ticketing system!

Here is the full email I received:

Security Breach
User information for tickets.opscode.com and wiki.opscode.com compromised.

What Happened?
A vulnerability in the third-party software that runs our Open Source Chef wiki and ticketing system was exploited to gain access to that particular system. While on this system, the attacker gained escalated privileges and downloaded the user database for the wiki and ticketing system.

What information was exposed?
The user database that was accessed contained usernames, email addresses, full names, and hashed passwords. We believe these passwords are adequately secure (the software in question uses the PBKDF2 algorithm), but we will be forcing a password change on the ticketing and wiki systems. If you use this password on other systems, we suggest choosing a new password on those systems as well.

Were any of my personal tickets accessed? What about my Hosted Chef data?
We are still investigating this breach; however, there is currently no evidence that any other systems were impacted or that other data was compromised.

Does this affect my Hosted Chef accounts?
This does not directly impact your Hosted Chef data or accounts. If you use the same username and password, it is recommended that you change this.

How did you catch the breach?
Our security monitoring alerted us to the unauthorized access. Upon investigation, we confirmed the unauthorized activity and immediately took steps to terminate the unauthorized access, isolate the affected systems, and secure forensic data.

What has been done to prevent this type of unauthorized access?
We are working with our third party software providers to identify the vulnerability and apply the appropriate patches to the systems.

What should I do now?
You will be asked to change your password the next time you access wiki.opscode.com or tickets.opscode.com. If you use the same credentials at any other site, you should assume that those credentials have been compromised and update them immediately. You may also wish to follow @opscode_status on Twitter for immediate updates.

We will provide additional details as they become available.

If you have any questions please contact Opscode at security@opscode.com.
You are receiving this email because you have an account in our ticketing system (http://tickets.opscode.com) or on our wiki (http://wiki.opscode.com).

Our mailing address is:
Opscode
1008 Western Ave
Suite 600Seattle, WA 98104

Add us to your address book

Copyright (C) 2013 Opscode All rights reserved.

Forward this email to a friend
Update your profile

Linksys E900 serial port pinout

Lately I did some hacking with this router, and since I couldn’t find any information about the serial port and especially about its pinout I decided to publish what I found out.

First: to take the router apart you need to remove the 3 screws which holds it together. Two of them under the rubber feet which could be easily removed, the third is however a little bit tricky: you need to remove the little star-shaped rubber foot which is close to the right end of the router (if the ports are looking to the left).

After you removed all screws you need to apply some amount of force, and possible a flat screwdriver to crack the case open. Don’t worry, the plastic is quite durable, so give it some force if necessary.

Now if the ports are still facing your left then you will find the serial port at the top left corner of the PCB. It looks like someone just drilled 6 holes into the PCB. (see picture)


20130804-082419.jpg

So now you only need to get some wires and a USB-TTL serial converter. The pinout (from top to bottom – ports still facing your left):

() ?
() TX
() RX
() ?
() ground

I haven’t done any testing with the ? holes since having only ground, RX and TX is enough. Now don’t forget, you need to connect your cable’s RX to the router’s TX and your TX to the router’s RX.

The correct settings for Putty are these:
Port: your COM port
Baud-rate: 115200
Data-bits: 8
Stop-bits: 1
Parity: None
Flow control: None

After you connect your adapter start Putty, then power up the router. You can see the boot-messages. If you hit Ctrl+C 4-5 times immediately after powering up the router you can stop the boot process and access the CFE menu.

SIM cards are broken

Today’s news is that Karsten Nohl did it again. This German security researcher is slowly, but constantly rising in my eyes to become one of those few heroic people that I think are changing and shaping our world to make it better. I simply love his work and his results, they are just plainly fenomenal.

Now he did it again, he cracked yet another aspect of GSM-3G which hasn’t really been looked at. He was able to remotely crack the encryption key of a SIM card and then get root access on it, meaning that he is able to modify the applications running the SIM card and also install new applications for example a malware on it.

This actually leads to sending SMS in the name of the victim, or actually cloning the whole card (some cards’ Java Sandboxes could be bypassed leading to a full memory access of the SIM card).

With the rise of new NFC payment systems which use SIM card Java Apps to perform authorization of payments this kind of access and behavior is certainly frightening.

Read the whole story at Forbes

HP’s love for Wisconsin

I just read this quite nice article about a backdoor in HP’s D2D/StorOnce Storage unit. It is unbelievable how a vendor can ignore such a huge problem.

Anyhow, I decided to publish the password behind the SHA1, mainly because the first Google hit for “online sha1 cracker” simply had this hash already in it, so I don’t see the point of not publishing it. I am just making your life easier to spare you a trip to this free service, enter their captcha and see the password:

78a7ecf065324604540ad3c41c3bb8fe1d084c50 SHA1: badg3r5

Thank you very much MD5decrypter.co.uk!

As I can read it it says Badgers, so I assume HPSuport must be in love with Wisconsin, which is a good thing: the Wisconsin Badgers are the athletic teams representing University of Wisconsin from Madison (Wisconsin’s capital). I like the Badgers too, that’s why I have a badger hangin’ on my keychain all the time. Guess I am kind of similar to HPSupport (? :D).

GSM project is up on GitHub

I decided to create a new, separate project for all my GSM research. My goal is to sniff my own data, crack the key, and read the SMS I sent/listen to the voice call I made. I am still hesitating in terms of hardware to use between OsmocomBB phones (a lot better, more accurate hardware for voice especially) and rtl-sdr (much easier to use, and  so far it already showed how awesome it is and how great capabilities it has).

Anyhow, for key cracking you need to have the a51_table files, which are available from torrents. Sadly I wasn’t able to find a correctly formatted file containing MD5 hashes for these 40 files, so I collected all the hashes from the a51 mailing list’s archives and put them in a format that could be used with the Linux utility ‘md5sum’ to automatically check integrity.

https://github.com/domi007/gsm


I will also commit a list containing exact sizes of the table files into this repository, so if you would not like to wait for md5sum you can just check the files based on size.