Ethical Hacking

Itt található minden munkámmal kapcsolatos dolog

How do you get the Kc from a SIM card?

Sounds kind of like a magical question, right? It is interesting that there are pretty much no guides on this topic, because for any GSM-debugging you need to have the so called Kc (pretty much a session key) that was used to encrypt the traffic sent over the air.

So let’s get started: there are as many as 4 ways to do this, and some other that I tried and don’t actually work, so let’s see:

Ways that work:

1. BlackBerry Engineering Screen

This is quite an easy catch: pretty much on all of the BlackBerries you can enable the so called “Engineering Mode” which will simply show you the current Kc. Not much of fun, but a reliable, good way to do it.
TESTED: YES (as shown by Karsten Nohl for example at BlackHat 2010)
WORKS: YES

2. OsmocomBB Mobile App

Now, this one is quite a tricky one, because setting up OsmocomBB already requires quite an amount of work, but once you have it up and running AND you are lucky with the cables and the code (which is not usually the case) you can simply run the mobile app and then use the telnet interface to get the Kc:
1. Upload layer1 to your phone
2. Run mobile -i 127.0.0.1
3. telnet 127.0.0.1 4247

After that simply say:
show subscriber 1
At the top you should see the Kc printed.
TESTED: YES
WORKS: PARTIALLY (I was able to get the Kc, but the mobile app itself wasn’t working for me, so I couldn’t place a call or send an SMS just to try out if I have the right Kc or not)

3. AT+CSIM Command

This one is the eldest and most well-known command: some phones allow you to use one of  the standard-defined-but-not-always-implemented AT command AT+CSIM which let’s you to send raw APDUs (=”commands”) to the SIM-card via the modem. The amount of phones supporting this is very limited, according to some people older Siemens and Alcatel phones let you do this. Also older iPhone’s (3GS/3G/2G) let you do this if you are jailbroken (you need to install minicom from Cydia then connect to the device /dev/tty.debug). Newer iPhone’s don’t really let you do this, iPhone 5 owners – we all are out of luck.

The command you would like to send is something like this:

 Sample run:

AT+CSIM=14,"A0A40000026F20"
+CSIM: 34,"000000096F2004001100BB010200009000"

OK
AT+CSIM=10,"A0B0000009"
+CSIM: 22,"E0940FC09AEFA000009000"

OK

Again, you find the last Kc used here: E0 94 0F C0 9A EF A0 00 and also the key sequence number: 00

From: http://openbsc.osmocom.org/trac/wiki/A5_GSM_AT_tricks

TESTED: NO
WORKS: PROBABLY

4. Using a SIM-card reader/Smart Card Reader

Some people said on the A51 mailing list that by using a simple SIM card reader they were able to extract the last used Kc from the card. I am not sure about this, but it sounds reasonable and the people who wrote about were quite convincing.

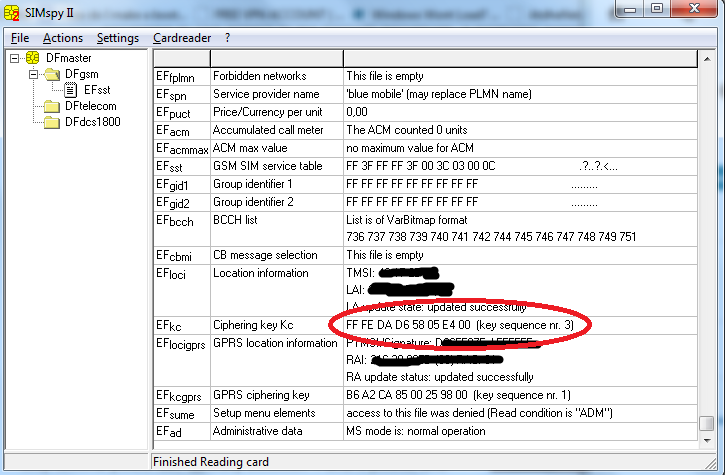
UPDATE: I tried this method using a simple PC/SC cardreader (exact model: Omnikey CardMan 5321 – it is great because it has both RFID and contact-smart card reading interfaces) and I am happy to tell you it works! Running SIMspyII after I inserted the SIM-card into the reader revealed the Kc and also everything else stored on the SIM card (I already turned off PIN-code verification for the card, not sure however how having a PIN code would change the procedure, but I assume the SIMspyII program has support for PIN-codes).

The only interesting part is that the SIM-card itself is a lot smaller than a standard smart card, so you need to either take the reader apart and insert the card alone, or use the plastic card the SIM-card came with, or use an old credit card.

reading_Kc_simspy

Also there are some rumors that you can’t power down your phone because it would erase the Kc from the SIM card so you need to pull the battery out. According to this mailing list thread you don’t need to do that because according to GSM specification the Kc should remain on the SIM card even if the phone is poweered down (Harald Welte). According to my experience this is true.

TESTED: YES
WORKS: YES

Other ways which don’t work:

1. Nokia DCT3 FBUS Connection:

Sounds like an ideal setup: you use an old Nokia DCT3 (3310/3410 etc.) and an FBUS cable. Using dct3-gsmtap from OsmocomBB you would be able to sniff all the packets the phone receves/sends, and also all communication between the phone and the SIM-card. Since we know the command we are looking for (see above, A0 A4 …) we can easily find the Kc – one would think. Sadly that’s not the case, Nokia’s engineers closed this possibility: after the command the next packet we can see coming from the SIM card is an empty packet. This causes Wireshark to say Malformed packet and shows no data in it – which is totally right, after looking at dct3-gsmtap’s output you can observe the following:

SIM: 0xA0 0xA4 0x00 0x00 0x02 0x7F 0x20
SIM:

So, empty message coming back.
TESTED: YES (Nokia 3410 + FBUS cable)
WORKS: NO


I will update this list as soon as I find new ways to extract the KC.

I am still in love with those Chinese cables….

I jsut bought some really old data cables for my Nokia 3410 and I must tell you they suck really bad. Let me tell you a little bit about the background:

I am currently really into everything that is security & GSM, therefore I thought it would be great to have a data cable which I can use with my old Nokia 3410 to enable the so called “Network Monitor” mode. In this mode the phone shows you a lot of useful information like the frequency it is using (ARFCN) or the current temporary ID of the SIM card (TMSI).
So, as a normal user would do I went to my friend Google and asked him about this cable. He quickly showed me some results which were quite funny: some Hungarian webshops still have these cables in stock! I was quite happy because the price was really low and I thought it would be great to buy from a shop and not from some random person.

So the cables came like two days later, and I tried to connect them to my phone. None of the cables seemed to fit. I was really angry, and thought about calling the shop telling them they are selling junk (which wouldn’t be surprising at all sadly) but then I found an archive website that shows you how to connect the cable properly.
The secret is quite easy once you know it: you need to get rid of the nice soft protecting foam that is glued all around the pins of the cable (who would have thought…). After that I connected the phone to my computer and I was able to turn on the Network Monitor – yeah, let’s all be happy.

But how is this related to poor quality Chinese cables?

Let me finish the story:
As time went on I wanted to get more information out of the phone and I already found the tool for this, naturally it is part of the Osmocom-family, it is called dct3-gsmtap. It can use the serial connection to your phone to actually capture GSM and SIM-card data and then forward it to Wireshark for later analysis. Sweet, just what I wanted to try out.
I installed it, tried to run it, and it says something like “no answer from the phone”. What the ****? I just communicated with the phone, and turned on the Network Monitor!

So I went back to Google and tried to research this, and finally found the cause:
Apparently for Nokia phones you can have 2 kind of cables, one is called MBUS (M2BUS) the other one is called FBUS. They differ in speed, baudrate and also capabilities. MBUS is an older simpler implementation of a serial line – it only uses GND and MBUS_PIN (data pin) to communicate. It is slow, and not really useful, that’s why Nokia decided to introduce FBUS which uses GND, RX_PIN and TX_PIN so it is a lot faster and more reliable serial connection.
Guess which connection is supported by pretty much all of the tools available. Yes, FBUS.
Guess what kind of cable do I have? Yes, MBUS. Sweet…

But I didn’t stop there, I wanted to see, if there were truly only 2 pins connected in my cable, or what was going on (because the interface facing the phone actually has all 4 pins). It turned out, that I do have 4 pins connected, but if I trace the whole cable it turns out that one of the magic plastic boxes on the cable (you know those little plastic boxes that are  on some cables for noise-cancelling or something like that) has all 4 cables coming in and only 2 cables going out.
So, I have an awesome cable which has all of its capabilities limited because some retard thought ‘yeah, why don’t we cut these two wires right at the middle of the cable?’.


Fortunately Google is still my friend and I found a random guy on the Internet who is Hungarian and has one perfectly fine FBUS cable for Nokia 3310/3410 which he is willing to sell. Ironic.

GPRS Sniff fixed patch

I started trying out Karsten Nohl’s and Luca Melette’s GPRS sniffing tutorial (https://srlabs.de/gprs) and I found out that because of some changes that were made to the code the patch provided with the tutorial fails to work.

After some searching I found the solution which was pretty much manually fixing some lines of the code and of the patch file. I ended up with a new patch file that works with the latest burst_ind branch of Sylvain Munaut. I put it up here:
https://github.com/domi007/gprs_sniff/blob/master/gprs_new_patch

Whatever I create during trying out this tutorial will be available at the new repo I created:
https://github.com/domi007/gprs_sniff/

How to correctly handle a security breach – Drupal.org

I just got an e-mail from Drupal.org – they have found out that somebody had unauthorized access to user data at drupal.org and groups.drupal.org. They are still investigating, however they would like to have every member of the community to change his/her password.

Let’s see the exact case:

The Drupal.org Security Team and Infrastructure Team has discovered unauthorized access to account information on Drupal.org and groups.drupal.org.

This access was accomplished via third-party software installed on the Drupal.org server infrastructure, and was not the result of a vulnerability within Drupal itself. This notice applies specifically to user account data stored on Drupal.org and groups.drupal.org, and not to sites running Drupal generally.

Information exposed includes usernames, email addresses, and country information, as well as hashed passwords. However, we are still investigating the incident and may learn about other types of information compromised, in which case we will notify you accordingly. As a precautionary measure, we are asking all users to reset their passwords at their next login attempt. A user password can be changed at any time by taking the following steps.

  1. Go to https://drupal.org/user/password
  2. Enter your username or email address.
  3. Check your email and follow the link to enter a new password.
    • It can take up to 15 minutes for the password reset email to arrive. If you do not receive the e-mail within 15 minutes, make sure to check your spam folder as well.

All passwords on Drupal.org are stored in an hashed format. All Drupal.org passwords are both hashed and salted, although some older passwords on groups.drupal.org and other Drupal 6 sites were not salted.

I think that’s the proper way to handle a data breach – close the hole as fast as you can, notify everyone as soon as possible, then investigate.

For more information visit:
https://drupal.org/news/130529SecurityUpdate

Compiling the JailbreakMe.com 3.0 star_ exploit – episode 2

Previous episode – episode 0

Previous episode – episode 1

We left off last time trying to run the final, ultimate command:

./make.py pdf

And it failed with BANGing errors. Well, it took me some time to realize what the main problem was: in Python you need to first declare global variables, and only then can you use them in ‘functions’ or whatever you call them in Python (yeah, my Python knowledge is, um, somewhat ‘limited’ to say the least :D).

So all I had to do is copy the declarations of each global variable from all the ‘functions’ to the top of the file. After that it continued, but just to hit me again now with a “No such file or directory” error.

Turns out, that in the latest SDK gcc isn’t called gcc-4.2 anymore, but just simply gcc. So I needed to change that, then change the path because it wasn’t good either, then correct everything inside of the ‘functions’ too.

After that I needed to create a symbolic link named cur inside of config pointing to SOURCE/bs.

After that I just needed to add some more changes, because the regexp used to construct the current target device and build number didn’t work, so I harcoded in my values: (I know it is dirty, sorry…):

#device, version, build_num = re.match('(i[A-Z][a-z]+[0-9],[0-9x])_([0-9\.]+)_([A-Z0-9]+)', firm$
device = "iPod3,1"
version = "4.3.3"
build_num="8J2"

After all this, it seemed to be fine… but only for some seconds:

./make.py pdf

Assertion failed: (things[i].r_length == 2), function relocate_area, file mach-o/link.c, line 30.
fabricate: 'python' exited with status -6

I had a look at the file in question (SOURCE/data/mach-o/link.c), it is quite a simple one, but the function is quite complicated. As far as I know (right now) it gets (a) binary object(s) and some other parameters and it does some work with these: first of all it creates an array of relocation_info structures with the parameters loaded in, then it goes through all the array items with a for-loop. The first step of the for-loop is the assertion:

        assert(things[i].r_length == 2);

So, the things array’s (that contains relocation_info structures) i-th item’s r_length needs to be 2. Looking at the header file it means “Long”. Well, for me (I put some printfs in the file to see what is going on) it works fine, but then it gets a 0 instead of 2. BANG, there is the error.

Sadly I don’t know yet how to continue, the error could be caused either by the input file (kernel cache) or the code itself. I am pretty sure it is the input file, but still not 100% sure about it, so I will keep digging.

See you in the next episode (I hope there will be a next one :)).

Compiling the JailbreakMe.com 3.0 star_ exploit – episode 1

Previous episode – episode 0

So, last time I was just about to do some compiling, getting down to real work, right? Well, let’s have a look at the README file of star_:

How to use:
- git submodule init -u
- ln -s /Developer/Platforms/iPhoneOS.platform/Developer/SDKs/iPhoneOS4.3.sdk /var/sdk
- add binaries to bs, e.g.
    mkdir iPhone2,1_4.3.3_8J2
    cp decrypted_kernel iPhone2,1_4.3.3_8J2/kern
    cp dyld_shared_cache_armv7 iPhone2,1_4.3.3_8J2/cache
    OR import an ipsw:
    grab https://github.com/posixninja/xpwn.git
    install "xpwntool", "hfsplus", and "dmg" to ~/xpwnbin/
    in here: cd config; python ipsw.py whatever.ipsw

- get t1utils and apply this patch: http://pastie.org/2251647
- get http://github.com/comex/xnu-env and point fs/xnu to it
- ./make.py pdf

As you can see it isn’t very long, but also not very detailed. Fortunately I was able to figure out that step 0 would be having a Mac OS X box up and running. Thanks to some guides I was able to do this pretty easily using VMware Player, and I have a Mac OS X 10.7.5 Lion machine up and running. I installed MacPorts, which is an essential component if you are planning on doing anything from the Terminal.

So, step 0 completed, let’s go on with step 1:

Cloning the GIT-repo and running the submodule init was pretty straightforward, except that the command in the README doesn’t work anymore, instead I did:

git submodule init
git submodule update

After that I had all the sources needed, let’s get to step 2 which is linking the SDK to /var/sdk. Well, it was kind of natural to me that I need to get the SDK from somewhere, which means going to the Mac AppStore, signing in with an Apple ID and install Xcode. If Xcode is installed you still need to find the SDK, here is what I have done:

find / -name iPhoneOS.platform
ln -s /Applications/Xcode.app/Contents/Developer/Platforms/iPhoneOS.platform/Developer/SDKs/iPhoneOS6.1.sdk/ /var/sdk

You probably noticed, that I have a slightly different path and also iPhoneOS6.1.sdk, not 4.3. As far as I know this SDK still has support for iOS 4.3 in it (you can even select iOS 4.3 as your Build Target in Xcode), so this should not cause any problems.

All right, so far it hasn’t been very hard, let’s go to step 3, which is getting some required files from the IPSW file we need.

First of all I downloaded the IPSW file using idownloadblog.com. After that I tried to compile xpwn but I failed because somehow I wasn’t able to install CMake, so I searched the web and found some binaries of xpwntool which work great.

After that I thought I have everything to run the command, so why not give it a go?

mkdir bs          #this is the output dir and it needs to be there
cd config
python ipsw.py iPod3,1_4.3.3_8J2_Restore.ipsw

And BANG! an error:

Couldn't get keys for iPod3,1_4.3.3

Okay, let’s have a look at the Python script. After some minutes it was obvious that the script uses a file – keyz.txt to get decryption keys for the files inside of the IPSW. So I only needed to go to iphonewiki and get the keys for my iPod Touch. After I inserted the values to keyz.txt the script seemed to continue, but only after some seconds, it failed again:

lzssfile.c:createAbstractFileFromComp:112: mismatch: 4073636 7933935 7933952 ba 8a
error: cannot open infile

Well, that’s awkward, I mean what can I do with this? Fortunately there is one Google hit for this error message, which is from iphonewiki, this talk. According to the talk the solution is to give xpwntool the switch -decrypt and then later go on with manually processing the file (which is now decrypted but not decompressed).

So I did exactly that:

unzip iPod3,1_4.3.3_8J2_Restore.ipsw #Yeah, IPSW = ZIP :-)
~/xpwnbin/xpwntool kernelcache.n18 kernel_decrypted -k KEY -i IV -decrypt

Great, this finished without any errors, let’s get to the decompressing part. According to the book ‘iOS Internals’ (this part of it could als be read at Google Books for free) you need to open the file with ‘od’ find a specific pattern, then using the offset run the decompressor program which is called ‘lzssdec’. Well, od was easy to use since it is built into OS X as far as I know, so I only needed to get lzssdec. I found its source code easily with Google, so here is what I did:

g++ -o lzssdec lzssdec.cpp
od -A d -t x1 kern_decrypted | more
#Looking for a specific pattern: ce fa ed fe
lzssdec -o OFFSET < kern_decrypted > kern_final

If we were lucky in kern_final we have a decrypted and decompressed binary, let’s check it:

file kern_final
kern_final: Mach-O executable arm

Success, let’s move on!

Well, we have the kernel file, so now we need to get the other two files: cache and dyld. To do that the easiest way is to comment out the kernelcache stuff from ipsw.py and then just run it. This will create the missing two files in the directory SOURCE/bs. We need to copy kern to this folder too.

Awesome, we are almost there, right? What is next on the list?

get t1utils and apply this patch: http://pastie.org/2251647

Well, this isn’t hard, is it? First open the patch link, and look at the header:

t1utils-1.27/t1asm.c

So we need to get the source of t1utils-1.27, naturally Google is your friend. After you got the source unpacked proceed with standard patching-procedure:

cd t1utils-1.27
patch -p1 < PATCH_FILE_FROM_PASTIE

It should work without any errors, so all what is left is to compile and install:

./configure && make
sudo make install

Great, this was easy, let’s continue!

get http://github.com/comex/xnu-env and point fs/xnu to it

OK, this shouldn’t be a problem after what we came through, right? Git clone, ln -s done.

So, here is the big moment, let’s try the last command:

./make.py pdf

BANG, errors right in the face as my friend would say, what’s wrong? We shall see that in the next episode.

Compiling the JailbreakMe.com 3.0 star_ exploit – episode 0

Well, I finally started working with mobile-devices from the newer era, namely iOS (as you might know with older Windows Mobile devices I did some hacking back in 2010 at Hacktivity – a presentation that was a complete disaster, but I learned a lot from) , and my first finding is related to MobileSafari in some way, so I decided to have a look at the exploit code which is behind JailbreakMe.com 3.0.

Of course first of all I needed a device that is compatible with JailbreakMe.com, which isn’t as easy as it sounds. Why? Because of the way Apple deploys firmware to its devices.Every single time you would like to restore your iOS device to a certain iOS version iTunes (for beginners: the program you use to initiate and manage the restore process from your computer) makes a request to Apple’s server to ask for a cryptographic signature that is specific to your iOS device.

After it gets the signature it passes it to the device, together with the firmware image. The device checks the signature and if everything is OK it starts the restore process. There is also some encryption involved in the background, but to keep things simple I will say that without Apple’s signature you can not flash any firmware on the device. Many people tried to circumvent this, but it is not possible (yet), so what most people do is they save the signature for later use (the signature is not protected against replay-attacks and the request which needs to be sent to Apple is easy to understand) meaning that once you have a signature for a certain device and a certain iOS version you can always restore to that version (signature files are known as SHSH blobs).

This means that once Apple rolled out a new version of iOS it simply stops signing any requests that are for older versions, forcing anyone who tries to restore to an older version to upgrade. Since the last version of JailbreakMe.com (v3.0) works only on iOS 4.3-4.3.3 I needed a device with SHSH blobs saved for such iOS version.

Somehow I always have a little bit of fortune in these situations, because only after looking on the internet for some hours I found an iPod Touch 3G, which has been jailbroken and was running iOS 5.0.1. Good news, but I need something older, so I met the guy and had a look at the device. You can’t imagine my joy and happiness when I saw his Cydia homescreen: “SHSH blobs are available for: iOS 4.3.3, iOS 5.0, iOS 5.0.1”
I bought the iTouch immediately.

OK, having the device itself is great, I restored it to 4.3.3 and went to JailbreakMe.com, clicked “Install” and it worked. So far so good, but I want to do more, I want to customize the payload of the jailbreak. How can I do that? Well, let’s start with understanding what JailbreakMe.com is doing:

1. Based on your User Agent it decides which exploit you need (there is one main exploit which has been compiled for all the compatible devices and iOS versions)

2. When you hit install it hits you with a crafted PDF file that has a special font embedded in it, basically (as far as I understand) the font-parser engine has the vulnerability in it that allows comex (the creator of the exploit) to posix_spawn() a process with root privileges

3. posix_spawn() runs a binary that was extracted from the PDF to /tmp (it is called locutus) and that binary takes care of the rest: downloading necessary files, and installing them onto the device

4. Comex is a real Apple guy, so he worked some time on the eye-candy stuff: he hooks into the Springboard process of iOS (Springboard is responsible for the UI of iOS) to show a Cydia icon and a progress bar under it which imitates what you can see when you install something from the AppStore (that is quite funny to me, it truly looks like I am just installing something from the AppStore :D)

So, after knowing this I decided to go on and change locutus, since it is the process which can do anything, it has root privileges, so it is really a jackpot. I don’t even need to know what exactly the exploit does if I can change its payload, right? (kind of Metasploit idea :D).

How can I change what locutus does? Well all the source-code of the exploit is online:
https://github.com/comex/star_

So, first would be downloading all the code and make a trial-run to see if I can at all reproduce the same PDF-files comex is hosting @JailbreakMe. In the next episode I will show, why isn’t this so easy as ‘git clone && ./configure && make’ and profit.